The extension overlays your personal "already had it" status and, when the match is exact, your rating for beers from your Untappd history on craft beer shop pages. The supported shops, grouped by where they ship from, are:
beershop.pl, beershop.cz, beershop.sk, beershop.eu, and beershop.de;
the extension checks the beer name against the product address so a trailing
style label is not mistaken for part of the nameTo get everything working you need three things: (1) upload your beer history to the bot, (2) get an access token, (3) install and configure the extension. Step by step below.
The extension works even without a token: shop pages show global Untappd ratings (the gold star badge) and links to the beer/search. This lets you see right away how it works.
Products that a supported shop itself files under a "not beer" category also get
a grey ✕; it needs no token and is not a link.
Personal features are unlocked by a token (Part 2): a green check "you already
had this" badge with your own rating, a dashed ? outline for uncertain matches, plus searching
for missing beers and check-in syncing. The extension popup will show "Not
connected" (English UI) until a token is added.
This is done once in the Telegram bot. It's your Untappd history that gives the extension the data on what you've already had (without it, no badges will appear).
/start./lang.Send:
/link <username>
where <username> is your Untappd handle (a full URL
untappd.com/user/<username> also works). Reply: ✅ Linked to untappd.com/user/<username>.
/import command.✅ Imported N check-ins.After this, the bot knows exactly what you've had and how you rated it — the extension will use this.
You can update your history any time by sending a new export via
/import.
Send:
/extension
The bot will reply with instructions and a token in a copyable block
(<code>…</code>), plus the API address and a Chrome Web Store link.
The bot no longer sends zip files.
Important: the token rotates 1:1 — every
/extensioncall creates a new token and invalidates the previous one. If you ever run/extensionagain, don't forget to update the token in the extension settings.
Copy the token — you'll need it in Part 3.
The extension is installed from the Chrome Web Store — building from source is not required, and the bot no longer sends zip files.
Open the extension's store page and click "Add to Chrome":
https://chromewebstore.google.com/detail/fdelmnhijeiojadcaihfdpecfcldbndg
If you see "This item is not available" — sign in to your Google account in the browser and reload the page. The extension is flagged 18+ (beer content), so the store hides it from signed-out visitors and never shows it in store search. The direct link works for anyone signed in.
The extension will appear in the list. Pin its icon to the toolbar (optional, but handy).
Updates arrive automatically — Chrome pulls new versions from the store on its own. Nothing to download, unpack, or reload.
If you have an extension token, the bot sends you a Telegram message once a
new version actually reaches users (not when it's merely submitted for
review). Don't want those — send the bot /announce off.
Switching from an older unpacked build? Paste the token in Options (Part 3) and remove the old copy in
chrome://extensions. It's the same token — no need to re-issue it: it isn't tied to an extension ID and works in both copies at once until you remove the old one. Do remove the old copy, though: two installed copies both draw badges on the same shop page and duplicate each other.
For developers: building from source. If you want to build it yourself:
cd extension && npm install && npm run build→ loadextension/dist/. The samenpm run buildalso writesextension/warsaw-beer-overlay-<version>.zipnext to it.
The settings page itself has a "Read the setup guide →" link at the top that brings you back here — handy if you land on Options without having seen this guide first.
Open the extension's settings page:
chrome://extensions → on the extension's card → "Details" → "Extension options".Paste the token you got from the bot (/extension) into the "Token" field.
Leave the "API URL" field at its default:
https://beer-api.ysilvestrov-ai.uk
(change it only if you're running your own API instance).
(Optional) Check "Find missing beers via Untappd (uses your Untappd
session)" — then the extension will search for beers not yet in the
bot's catalog, using your own Untappd session/IP: the bot returns the
search parameters, and the extension makes a browser request to
Untappd's public Algolia API and sends the bot only the resulting JSON
candidates. Search is limited to a few requests per page, respecting
anti-ban limits. The browser will ask for permission to access
untappd.com and *.algolia.net — allow it.
Off by default.
Separately from this checkbox, on Flasker. On
flasker.com.uapages, the extension automatically loads the pages of all visible products in the background, even without this permission. From there it reads the product category, the brewery, and the Untappd link the shop publishes. This way beers with no volume listed aren't lost, and glasses, souvenirs, and other products the shop confirms aren't sent for matching as beer and get a red✕. Requests go only toflasker.com.uaitself — no new browser permission is needed. It also works for imported items that Flasker labels with the generic brand "Імпортне пиво" (imported beer): the extension doesn't treat that label as a brewery name and instead checks the product against the published Untappd link.
Click "Save".
Click "Test connection":
/extension again).Open any shop from the supported list above, either directly or from the popup's "Supported shops" directory described below.
The extension automatically reads the beer grid on the page, sends it to the bot for matching, and draws a corner badge on the cards. What the badges mean:
On a large page the finished cards get their usual badge while later ones may still be showing a check-in-progress state — you do not have to wait for the whole catalog.
Only two marks carry colour — the green check and the gold star. Those are the cards you choose between; everything else is grey on purpose, so it does not compete for your attention.
| Badge | What it means |
|---|---|
green check + a rating (e.g. 4.2) |
you've already had this beer — shows your rating; click opens Untappd |
| green check + gold star with a rating | you've had it but never rated it — the global rating is shown; click opens Untappd |
| green check with no number | you've had it; there is neither your rating nor a global one yet |
| gold star + a rating | you haven't had it yet — shows the global rating; click opens Untappd |
| gold star with no number | you haven't had it, and Untappd has too few ratings to show one |
any of those in a dashed outline with ? |
the match is uncertain — the beer was found, but we are not sure; click opens Untappd to check. Here a check only means “you probably had this”, so we do not show your rating. If a star and number appear, that number is still the global rating — not evidence that you did not leave your own |
| a magnifier | not found on Untappd; click opens a search pre-filled with the name |
| a grey ring | the card is waiting its turn |
| a grey spinning arc | this beer is being checked right now |
| a grey reload arrow | we did not get to this one this time. Hover for the hint; reload the page and these cards carry on being checked |
a triangle with ! |
the check failed: Untappd did not answer, the connection dropped, or the card could not be parsed. Hover to see which |
| a grey ✕ | the shop itself filed the product as not beer; the badge is not clickable |
Every badge carries a screen-reader label that spells the state out, and hovering it
shows the same wording. For example, ✅ ? ⭐ 3.6 is read and shown as “Uncertain
match. You probably had this. Global rating 3.6”.
No badge at all now means one thing only: the overlay does not run on this page
(a whole not-beer category).
This also works with SPA navigation: when the shop re-renders the list (filters, pagination), the overlay updates itself.
The check + your rating only appear for beers from your own history (requires
/import, Part 1). The star is also shown for beers you haven't had yet, if they're already in the bot's catalog. A number without a star after the check is always yours; a number with a star is the global one.The dashed
?outline means every table row about your own rating is qualified: we do not know for certain that this is the same beer. For example,✅ ? ⭐ 3.6means “you probably had this; 3.6 is the global rating”, not “you did not rate it”. The outline now appears on beers you have not had, too: an uncertain match used to look exactly like a certain one, with no cue to check for yourself.
When a shop's product page links to Untappd itself, the extension follows that link — the badge then shows exactly that beer, even if the shop spells its name differently. When the link disagrees with the brewery the shop names on the same page, the badge stays cautious (a dashed
?outline): the beer was found, but we are not certain — click to check.
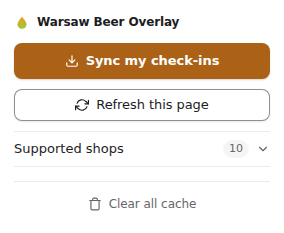
Clicking the extension's icon on the browser toolbar opens a small menu. The buttons are ordered by importance — the main action on top, the housekeeping one at the bottom:
Syncing… 1200 / 8200): that means "working", not
"broken". If a sync stops, the same line says why. Two of the messages are
about Untappd rather than your connection: Untappd did not return your check-in feed… — open untappd.com and check you are signed in to the
account you linked in the bot; Untappd returned an unexpected page, so the sync stopped at… — what was loaded before that is kept; try again later, and if it keeps happening, load your
history with /import in the bot instead./import). With beer search enabled, a beer that reached
the catalog after the first check swaps its magnifier for the rating on an
ordinary page reload. The result lands in the caption right
below the button: Nothing to refresh — no beers found on this page. when
the extension didn't find any beer cards there, or Refreshed — 3 beers will be rechecked. when it did. On a page the extension doesn't support, the
button is greyed out and inactive, with that same caption explaining why
— and clearing the cache no longer wipes that explanation away.Clear cache for 412 entries?), the second clears
and reports (Cleared 412 entries.) right below the button. Changed your mind?
Close the popup — nothing happens.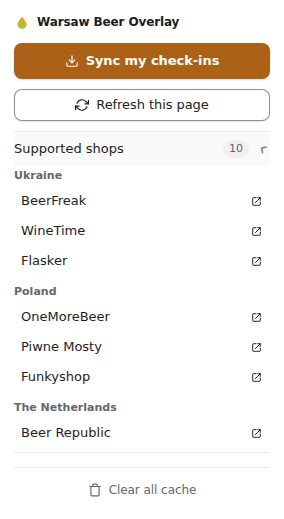
Until a token is saved, the popup puts a "Not connected" block with a
"Get a token" button directly under the header — it's the first stop for
Tab. The "Sync my check-ins" button is greyed out and inactive in this
state, captioned Add a token to sync your check-ins.: without a token,
syncing couldn't succeed anyway, so the extension doesn't ask for extra
access to untappd.com only to show a connection error.
Once you save a token (Part 3), that block disappears and "Sync my check-ins" becomes the main button again. The "Read the setup guide →" link doesn't go anywhere — it just moves down to the bottom of the popup, above "Clear all cache".
The popup follows your browser theme: in dark mode it's dark too.
The "Sync my check-ins" button in the popup loads your check-in history
directly from your Untappd session in the browser and sends it to the
bot — this is an alternative to /import that does not require Untappd
Supporter.
/link <username>.
Without this the button will show "Link your Untappd account in the bot
first (/link)".Add a token to sync your check-ins. instead (see above,
under "The toolbar button (popup)").untappd.com (to read your feed within your session) — click
Allow. If you decline, you'll see "Allow access to untappd.com to
sync your check-ins." and the sync won't start.Syncing… 1200 / 8200.| Symptom | What to do |
|---|---|
Test connection → health |
Check the "API URL" field and your internet/tunnel access. |
Test connection → unauthorized |
The token expired or is wrong. Run /extension, paste the new token, Save. |
Test connection → network |
The browser couldn't reach the API: for a non-default URL, grant permission for the host (Save again, or chrome://extensions → Details); check your network. |
| Badges don't appear | 1) Are you on a supported site from the list above? 2) Have you run /import? 3) Reload the page. |
Ran /extension again — it stopped working |
The old token was invalidated. Paste the new token in the settings and Save. |
| Changed the API URL — it's not fetching | During Save the browser asks for host permission — allow it (or add the permission via chrome://extensions → Details). |
| Something else is wrong: a wrong beer or rating, a missing badge, a button that does nothing | Send /report to the bot, choose Extension, describe what you saw and attach a screenshot. The bot checks whether it is already known and replies with a link. Screenshots stay on our server and are not published. |
/start → /link <username> → /import (send your Untappd export) → /extension (copy the token; the bot also gives you the store link).https://chromewebstore.google.com/detail/fdelmnhijeiojadcaihfdpecfcldbndg
(if you see "Item not available" — sign in to Google and reload).